Nowadays, whenever students or developers want to build an AI project, more than 90% of the tutorials available on the internet force them to learn Python or Node.js first.
But what if you're a PHP developer or you simply want to run an AI chatbot on your shared hosting without installing Composer, heavy packages, or complex frameworks?
In this tutorial, we will build an AI Chatbot using PHP and the Google Gemini API. The entire project is lightweight and can run easily on almost any shared hosting server.
As you may already know, Google Gemini is Google's powerful AI model that can answer almost any type of question with accurate and intelligent responses.
If you want to integrate an AI assistant into your own website so visitors can ask questions and receive instant AI-generated answers, this tutorial will show you exactly how to build it using PHP.
We will use the Google Gemini API, and in this tutorial, we'll start with the free API plan. If you need higher usage limits later, you can easily upgrade to a paid plan directly from Google AI Studio.
This is a zero-budget project that works completely on the free tier.
Our chatbot will include:
- A modern dark-mode chat interface
- Real-time messaging without page refresh
- AJAX-based communication
- Lightweight PHP backend
- No Composer installation
- No heavy PHP packages
When a user submits a question, the PHP backend will wrap the message into JSON format and send it to the Google Gemini API using cURL. Gemini will process the request and return an AI-generated response, which will be displayed instantly inside the chat interface.
If you're a student or developer who wants to add an AI chatbot to your website or project, this tutorial is a simple and practical way to do it using only PHP.
So, let's start building our AI Chatbot using PHP and Google Gemini API.
1. Get Google AI Studio API Key
Before we start coding, we first need a Google Gemini API Key.
You can generate your API key by visiting Google AI Studio.
Google AI Studio API Key:
https://aistudio.google.com/app/apikey
Create API Key
After opening Google AI Studio, you'll see the Create API Key button.
Click on it, and a pop-up window will appear.
Now simply click the Create Key button.
Your API key will be generated immediately.
Copy the generated API key and save it safely in a text file or Notepad because we'll use it later inside our PHP project.
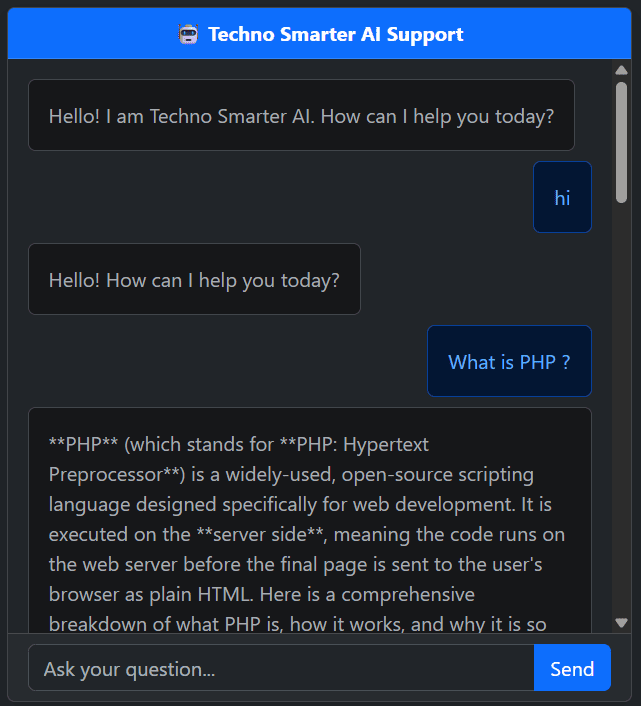
2. Create AI Chatbot Interface
Now we'll build the chatbot interface.
The interface will contain a text input where users can type any question they want to ask.
In this tutorial, we'll use Bootstrap to create a beautiful dark-mode chatbot UI.
We'll also use jQuery and AJAX so users can send questions without refreshing the page.
Whenever a user submits a message, AJAX sends the request to the PHP backend, which communicates with the Google Gemini API and returns the response instantly.
index.php
<!DOCTYPE html>
<html lang="en" data-bs-theme="dark">
<head>
    <meta charset="UTF-8">
    <meta name="viewport" content="width=device-width, initial-scale=1.0">
    <title>Techno AI Support</title>

    <link href="https://cdn.jsdelivr.net/npm/bootstrap@5.3.3/dist/css/bootstrap.min.css" rel="stylesheet">
    <script src="https://code.jquery.com/jquery-3.7.1.min.js"></script>
</head>
<body class="bg-dark">

<div class="container vh-100 d-flex justify-content-center align-items-center">

    <div class="card shadow w-100" style="max-width:500px;height:80vh;">

        <div class="card-header bg-primary text-center fw-bold text-white">
            ???? Techno Smarter AI Support
        </div>

        <div id="chatBody" class="card-body overflow-auto d-flex flex-column gap-2">

            <div class="alert alert-secondary align-self-start mb-0">
                Hello! I am Techno Smarter AI. How can I help you today?
            </div>

        </div>

        <div class="card-footer">
            <div class="input-group">

                <input type="text"
                       id="userInput"
                       class="form-control"
                       placeholder="Ask your question...">

                <button id="sendBtn" class="btn btn-primary">
                    Send
                </button>

            </div>
        </div>

    </div>

</div>

<script>
$(function(){

    $("#sendBtn").click(sendMessage);

    $("#userInput").keypress(function(e){
        if(e.which == 13) sendMessage();
    });

    function sendMessage(){

        let msg = $("#userInput").val().trim();

        if(!msg) return;

        $("#chatBody").append(`
            <div class="alert alert-primary align-self-end mb-0">
                ${msg}
            </div>

            <div class="alert alert-secondary align-self-start mb-0" id="typing">
                Thinking...
            </div>
        `);

        $("#userInput").val('');

        $("#chatBody").scrollTop(
            $("#chatBody")[0].scrollHeight
        );

        $.ajax({

            url: "bot.php",
            type: "POST",
            contentType: "application/json",
            dataType: "json",
            data: JSON.stringify({
                message: msg
            }),

            success: function(data){

                $("#typing").remove();

                $("#chatBody").append(`
                    <div class="alert alert-secondary align-self-start mb-0">
                        ${data.response || data.error}
                    </div>
                `);

                $("#chatBody").scrollTop(
                    $("#chatBody")[0].scrollHeight
                );
            },

            error: function(){

                $("#typing").remove();

                $("#chatBody").append(`
                    <div class="alert alert-danger align-self-start mb-0">
                        Failed to connect to the server.
                    </div>
                `);
            }

        });

    }

});
</script>

</body>
</html>
In the following code, we use Bootstrap and jQuery to create the chatbot interface.
The page contains a text input where users can enter their questions and click the Submit button.
When the Submit button is clicked, a JavaScript function called sendMessage() is executed.
This function sends the user's question to bot.php using AJAX.
The bot.php file then sends the request to the Google Gemini API.
Gemini processes the request and returns the answer in JSON format.
Finally, JavaScript receives the response and displays it inside the chatbot interface without refreshing the page.
3. Sending & Receiving Chatbot Responses
Whenever we work with an API, our website sends data to the API server and receives a response.
We'll use the same concept here.
The user's question is sent to bot.php, and this file communicates directly with the Google Gemini API.
After receiving the AI response, it returns the answer to our chatbot interface, where it is displayed immediately.
bot.php
<?php header('Content-Type: application/json');
$apiKey = "xx8RN6LKxxxxx6bpqxxxxGqxxxxikuw1dacUZ5MncF_v7wpxxx";
$data = json_decode(file_get_contents('php://input'), true);
$userMessage = $data['message'] ?? '';
if (empty($userMessage)) {
    echo json_encode(["error" => "Please write a message!"]);
    exit;
}
$url = "https://generativelanguage.googleapis.com/v1/models/gemini-3.5-flash:generateContent?key=" . $apiKey;
$payload = json_encode([
    "contents" => [
        [
            "parts" => [
                ["text" => $userMessage]
            ]
        ]
    ]
]);
$ch = curl_init($url);
curl_setopt($ch, CURLOPT_RETURNTRANSFER, true);
curl_setopt($ch, CURLOPT_POST, true);
curl_setopt($ch, CURLOPT_CONNECTTIMEOUT, 5);
curl_setopt($ch, CURLOPT_TIMEOUT, 15);
curl_setopt($ch, CURLOPT_POSTFIELDS, $payload);
curl_setopt($ch, CURLOPT_HTTPHEADER, [
    'Content-Type: application/json'
]);
curl_setopt($ch, CURLOPT_SSL_VERIFYPEER, false);
curl_setopt($ch, CURLOPT_HTTPHEADER, [
    'Content-Type: application/json',
    'Connection: close'
]);
$response = curl_exec($ch);
$curlError = curl_error($ch);
curl_close($ch);
if ($curlError) {
    echo json_encode(["error" => "cURL Failed: " . $curlError]);
    exit;
}
$responseData = json_decode($response, true);
if (isset($responseData['candidates'][0]['content']['parts'][0]['text'])) {
    echo json_encode(["response" => $responseData['candidates'][0]['content']['parts'][0]['text']]);
} else {
    echo json_encode(["error" => "Google Error: " . $response]);
}
?>
In this file, the first step is to configure the API key that we generated from Google AI Studio.
Simply paste your API key into the API key variable.
Instead of installing Composer or heavy PHP libraries, we'll use cURL, making the entire project lightweight and easy to deploy.
This approach works perfectly on shared hosting without requiring any additional packages.
After receiving the response from the Google Gemini API, we convert it into JSON format and send it back to JavaScript.
JavaScript displays the AI response inside the chatbot window.
4. Free Gemini API Usage
Google provides a free API tier, so you don't have to pay anything to start building your AI chatbot.
The free plan has certain usage limits, which are sufficient for learning, testing, and small projects.
If you need more API requests or higher limits for production applications, you can easily upgrade to a paid plan directly from Google AI Studio.
Conclusion
By following this tutorial, you can easily build your own AI Chatbot using PHP and the Google Gemini API without learning Python or Node.js.
This project uses PHP, AJAX, Bootstrap, jQuery, and cURL to create a modern, responsive, and lightweight AI chatbot that works even on shared hosting.
Because the project doesn't rely on Composer or heavy dependencies, it's easy to deploy on live servers and is perfect for students, freelancers, and developers who want to integrate AI into their websites with minimal setup.