A student admission form is one of the most important features for any school or college website. With this admission form, students can enter their details online and complete the admission process easily.
In this tutorial, we will create a complete Student Admission Form using PHP & MySQL with Dynamic Custom Fields. After the admission process is completed, a Print Preview page will be displayed so that students can print their admission form.
The Print Preview is an important part of the admission process because it allows students to easily print and save their admission details. We will also use Bootstrap to create a fully responsive admission form and a responsive print page.
In addition, we will create a Student List page that displays all admitted students. This project includes Dynamic Custom Fields, which means the admin can completely manage the form fields according to their requirements. For example, the admin can decide whether to collect the student's name, email, student ID, photo, file upload, or any other information. Everything can be customized.
In this tutorial, we will build a dynamic Student Admission Form (also known as a Student Registration Form) where all form fields can be added, edited, or removed according to your requirements.
So, let's see how to create a fully dynamic Student Admission Form with customizable fields.
1. Student Admission Form Database Tables
First, we will create the database tables where all student admission data will be stored. Along with that, we will also create tables for managing the dynamic custom fields.
In this project, we will create three tables.
form_fields
CREATE TABLE `form_fields` (
  `id` int(11) NOT NULL PRIMARY KEY AUTO_INCREMENT,
  `field_label` varchar(255) NOT NULL,
  `field_name` varchar(255) NOT NULL,
  `field_type` varchar(50) NOT NULL,
  `field_options` text DEFAULT NULL,
  `is_required` tinyint(1) DEFAULT 0,
  `status` tinyint(1) DEFAULT 1,
  `created_at` timestamp NOT NULL DEFAULT current_timestamp()
);
This table is used to create and manage all custom fields. Every custom field created by the admin will be stored in this table, and the admission form will be generated dynamically using these records.
students
CREATE TABLE `students` (
  `id` int(11) NOT NULL PRIMARY KEY AUTO_INCREMENT,
  `admission_no` varchar(50) DEFAULT NULL,
  `created_at` timestamp NOT NULL DEFAULT current_timestamp()
) ;
This table stores the student's admission number and the creation date. It acts as the main student table and is linked with the third table that stores all student field values.
student_field_values
CREATE TABLE `student_field_values` (
  `id` int(11) NOT NULL PRIMARY KEY AUTO_INCREMENT,
  `student_id` int(11) DEFAULT NULL,
  `field_id` int(11) DEFAULT NULL,
  `field_value` longtext DEFAULT NULL
) ENGINE=InnoDB DEFAULT CHARSET=utf8mb4 COLLATE=utf8mb4_general_ci;
This table stores all the values submitted by students for the dynamic custom fields along with the student ID.
Whenever a student opens the Print Preview page, all submitted information will be fetched from this table using the student's ID.
2. PHP & MYSQL Database Connection File
Now, let's create a database connection file. This file connects our PHP application with the MySQL database.
config.php
<?php
$host="localhost";
$dbname="tute";
$user="root";
$pass="";
try{
$pdo = new PDO("mysql:host=$host;dbname=$dbname",$user,$pass);
$pdo->setAttribute(PDO::ATTR_ERRMODE,PDO::ERRMODE_EXCEPTION);
}catch(PDOException $e){
    //die($e->getMessage());
}
?>
In the connection file, you only need to update your database credentials correctly, such as:
- Database Host
- Database Name
- Database Username
- Database Password
Once these credentials are configured correctly, your application will be connected to the database.
3. Student Admission Form Dynamic Custom Fields
Now we will create the Dynamic Custom Fields for the admission form.
Custom fields are fields that the admin can create, edit, or delete at any time. If additional fields are required later, they can also be added without changing the form code.
Using this feature, you can create different types of fields, such as:
- Text
- Number
- Email
- Image Upload
- File Upload
- Select Box
- Radio Button
- Date Picker
- Textarea
Now, let's write the code for creating dynamic custom fields.
form.php
<?php require("config.php"); $detect=$_GET['detect'] ?? ''; ?>
<!DOCTYPE html>
<html>
<head>
<title>Form Fields- Techno Smarter</title>
<link href="https://cdn.jsdelivr.net/npm/bootstrap@5.3.3/dist/css/bootstrap.min.css" rel="stylesheet">
</head>
<body>
<div class="container mt-4">
<?php
switch($detect)
{

case 'add':
    if(isset($_POST['save']))
    {
        $field_label=$_POST['field_label'];
        $field_name=$_POST['field_name'];
        $field_type=$_POST['field_type'];
        $field_options=$_POST['field_options'];
        $is_required=$_POST['is_required'] ?? 0;

        $stmt=$pdo->prepare("INSERT INTO form_fields(field_label,field_name,field_type,field_options,is_required) VALUES(:field_label,:field_name,:field_type,:field_options,:is_required)");

        $stmt->execute([
            ':field_label'=>$field_label,
            ':field_name'=>$field_name,
            ':field_type'=>$field_type,
            ':field_options'=>$field_options,
            ':is_required'=>$is_required
        ]);

        header("location:form.php");
        exit;
    }
?>
<div class="card">
<div class="card-header">
<h4>Add Field</h4>
</div>
<div class="card-body">
<form method="post">
<div class="mb-3">
<label>Field Label</label>
<input type="text" name="field_label" class="form-control">
</div>
<div class="mb-3">
<label>Field Name</label>
<input type="text" name="field_name" class="form-control">
</div>
<div class="mb-3">
<label>Field Type</label>
<select name="field_type" class="form-control">
<option value="text">Text</option>
<option value="number">Number</option>
<option value="email">Email</option>
<option value="date">Date</option>
<option value="textarea">Textarea</option>
<option value="select">Select</option>
<option value="radio">Radio</option>
<option value="file">File</option>
<option value="image">Image</option>
</select>
</div>
<div class="mb-3">
<label>Options</label>
<input type="text" name="field_options" class="form-control">
</div>
<div class="mb-3">
<input type="checkbox" name="is_required" value="1">Required</div>
<button type="submit" name="save" class="btn btn-primary">Create Field</button>
</form>
</div>
</div>
<?php
break;
case 'del':
$id=(int)$_GET['id'];
$stmt=$pdo->prepare("DELETE FROM form_fields WHERE id=?");
$stmt->execute([$id]);
header("location:form.php");
exit;
break;
default:
$stmt=$pdo->query("SELECT * FROM form_fields");
$data=$stmt->fetchAll(PDO::FETCH_ASSOC);
?>
<div class="card">
<div class="card-header d-flex justify-content-between">
<h4>Dynamic Fields</h4>
<a href="form.php?detect=add" class="btn btn-primary">
Add New
</a>
</div>
<div class="card-body">
<table class="table table-bordered">
<tr>
<th>ID</th>
<th>Label</th>
<th>Name</th>
<th>Type</th>
<th>Action</th>
</tr>
<?php foreach($data as $row){ ?>
<tr>
<td><?= $row['id']; ?></td>
<td><?= $row['field_label']; ?></td>
<td><?= $row['field_name']; ?></td>
<td><?= $row['field_type']; ?></td>
<td>
<a href="form.php?detect=del&id=<?= $row['id']; ?>" class="btn btn-danger btn-sm">Delete</a>
</td>
</tr>
<?php } ?>
</table>
</div>
</div>
<?php } ?>
</div>
</body>
</html>
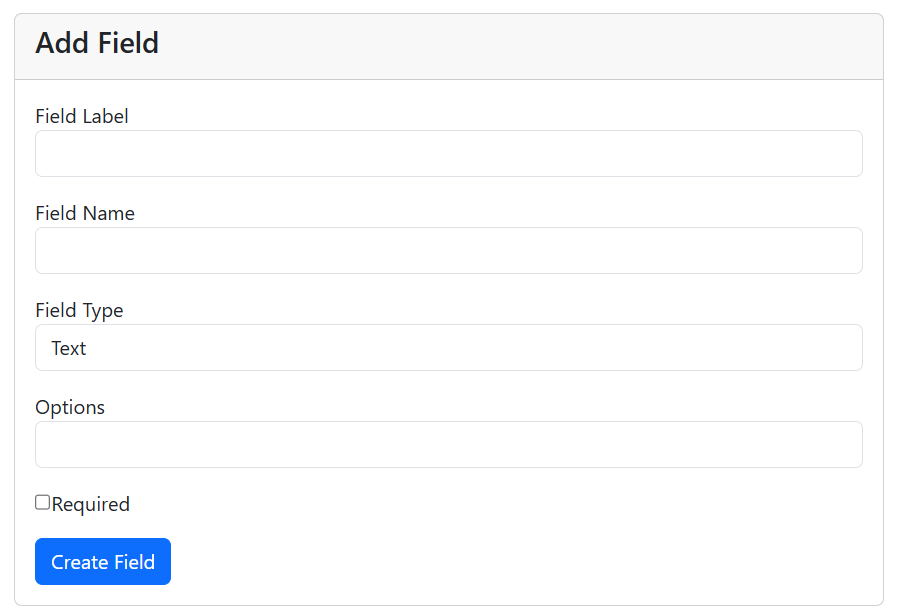
In the following code, we have created a system that allows the admin to generate different types of fields, like Student Name, First Name, Last Name, Father's Name, Mother's Name, Gender, Student Photo, Student ID, Class, and many more. Any type of form field can be created dynamically.
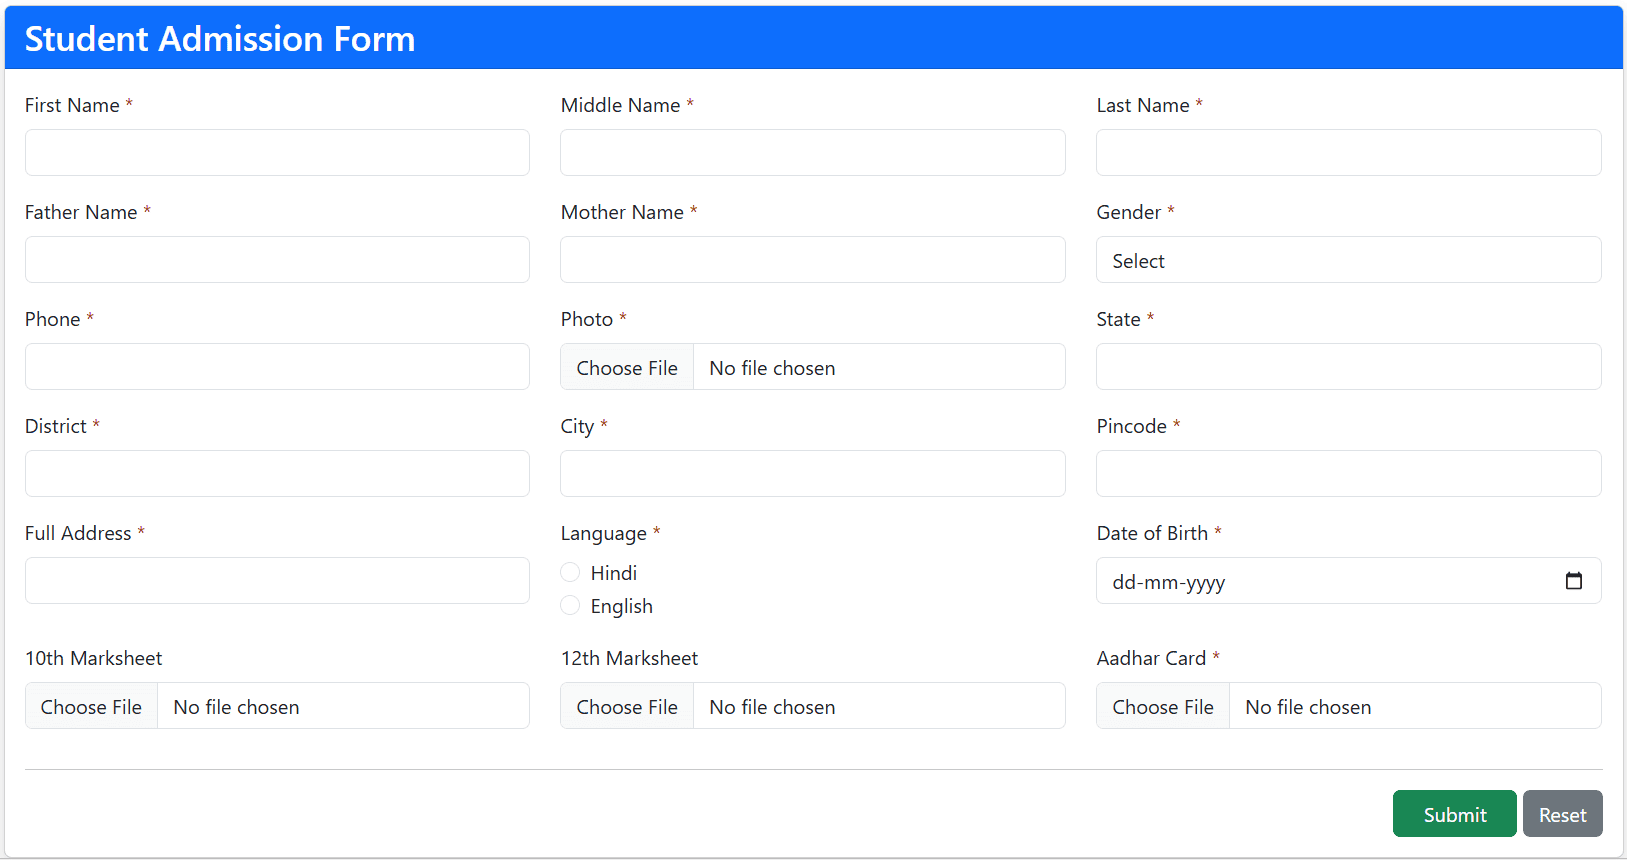
4. Student Admission Form on the PHP website
This is the main Student Admission Form page, where all the dynamic fields created by the admin will be displayed automatically.
admission.php
<?php require 'config.php';
$stmt=$pdo->query("SELECT * FROM form_fields WHERE status=1");
$fields=$stmt->fetchAll(PDO::FETCH_ASSOC);
?>
<!DOCTYPE html>
<html>
<head>
<title>Student Admission Form</title>
<link href="https://cdn.jsdelivr.net/npm/bootstrap@5.3.3/dist/css/bootstrap.min.css" rel="stylesheet">
</head>
<body>
<div class="container mt-4">
<div class="row justify-content-center">
<div class="col-lg-12">
<div class="card shadow">
<div class="card-header bg-primary text-white">
<h3 class="mb-0">Student Admission Form</h3>
</div>
<div class="card-body">
	<?php
	if(isset($_POST['submit']))
	{

		$admission_no="TS".time();
$stmt=$pdo->prepare("INSERT INTO students(admission_no) VALUES(:admission_no)");
$stmt->execute([
    ':admission_no' => $admission_no,
]);
$student_id=$pdo->lastInsertId();
$stmt=$pdo->query("SELECT * FROM form_fields");
$fields=$stmt->fetchAll(PDO::FETCH_ASSOC);
if($field['is_required'])
{
    if($field['field_type']=='file' || $field['field_type']=='image')
    {
        if(empty($_FILES['field_'.$field['id']]['name']))
        {
            die($field['field_label'].' is required');
        }
    }
    else
    {
        if(empty($_POST['field_'.$field['id']]))
        {
            die($field['field_label'].' is required');
        }
    }
}

foreach($fields as $field)
{
$value='';
if($field['field_type']=='file'|| $field['field_type']=='image')
{
if(isset($_FILES['field_'.$field['id']]))
{
$file=$_FILES['field_'.$field['id']];
$ext=strtolower(pathinfo($file['name'],PATHINFO_EXTENSION));
if($field['field_type']=='image')
{
$allowed=['jpg','jpeg','png','webp'];
}else{
$allowed=['pdf','doc','docx','jpg','png'];
}
if(in_array($ext,$allowed))
{
    $newname=uniqid().'.'.$ext;
move_uploaded_file( $file['tmp_name'],'uploads/'.$newname);
    $value=$newname;
}
}
}else{
$value=$_POST['field_'.$field['id']] ?? '';
}
$stmt=$pdo->prepare("INSERT INTO student_field_values(student_id,field_id,field_value) VALUES(:student_id,:field_id,:field_value)");

$stmt->execute([
    ':student_id'  => $student_id,
    ':field_id'    => $field['id'],
    ':field_value' => $value
]);
}
header("Location: print.php?id=".$student_id);
	}
	?>
<form action="" method="post" enctype="multipart/form-data">
<div class="row">
<?php
foreach($fields as $field)
{

$required=$field['is_required'] ? 'required' : '';

echo '<div class="col-md-4 mb-3">';

echo '<label class="form-label">'.$field['field_label'];

if($field['is_required'])
{
    echo ' <span class="text-danger">*</span>';
}

echo '</label>';

switch($field['field_type'])
{

case 'text':

echo "<input type='text' name='field_".$field['id']."' class='form-control' $required>";
break;

case 'email':

echo "<input type='email' name='field_".$field['id']."' class='form-control' $required>";
break;

case 'number':

echo "<input type='number' name='field_".$field['id']."' class='form-control' $required>";
break;

case 'date':

echo "<input type='date' name='field_".$field['id']."' class='form-control' $required>";
break;

case 'textarea':

echo "<textarea name='field_".$field['id']."' class='form-control' rows='2' $required></textarea>";
break;

case 'select':

$options=explode(',',$field['field_options']);

echo "<select name='field_".$field['id']."' class='form-control' $required>";

echo "<option value=''>Select</option>";

foreach($options as $option)
{
    echo "<option value='".trim($option)."'>".trim($option)."</option>";
}

echo "</select>";

break;

case 'radio':

$options=explode(',',$field['field_options']);

foreach($options as $option)
{
    echo "<div class='form-check'>";
    echo "<input type='radio' class='form-check-input' name='field_".$field['id']."' value='".trim($option)."' $required>";
    echo "<label class='form-check-label'>".trim($option)."</label>";
    echo "</div>";
}

break;

case 'file':

echo "<input type='file' name='field_".$field['id']."' class='form-control' $required>";
break;

case 'image':

echo "<input type='file' accept='image/*' name='field_".$field['id']."' class='form-control' $required>";
break;

}

echo '</div>';

}
?>
</div>
<hr>
<div class="text-end">
<button type="submit" name="submit" class="btn btn-success px-4">Submit</button>
<button type="reset" class="btn btn-secondary">
Reset
</button>
</div>
</form>
</div>
</div>
</div>
</div>
</div>
</body>
</html>
In the following code, we have created a responsive admission form using Bootstrap. Students can easily fill in their information and complete the admission process.
We have used different switch cases to display different input types such as Text, Number, Email, Select Box, Radio Button, File Upload, and more.
Finally, we have added a Submit button. Once the student fills out all the required information, they can click the Submit button to complete the admission process.
Make sure to create a folder for files "uploads" in your project.
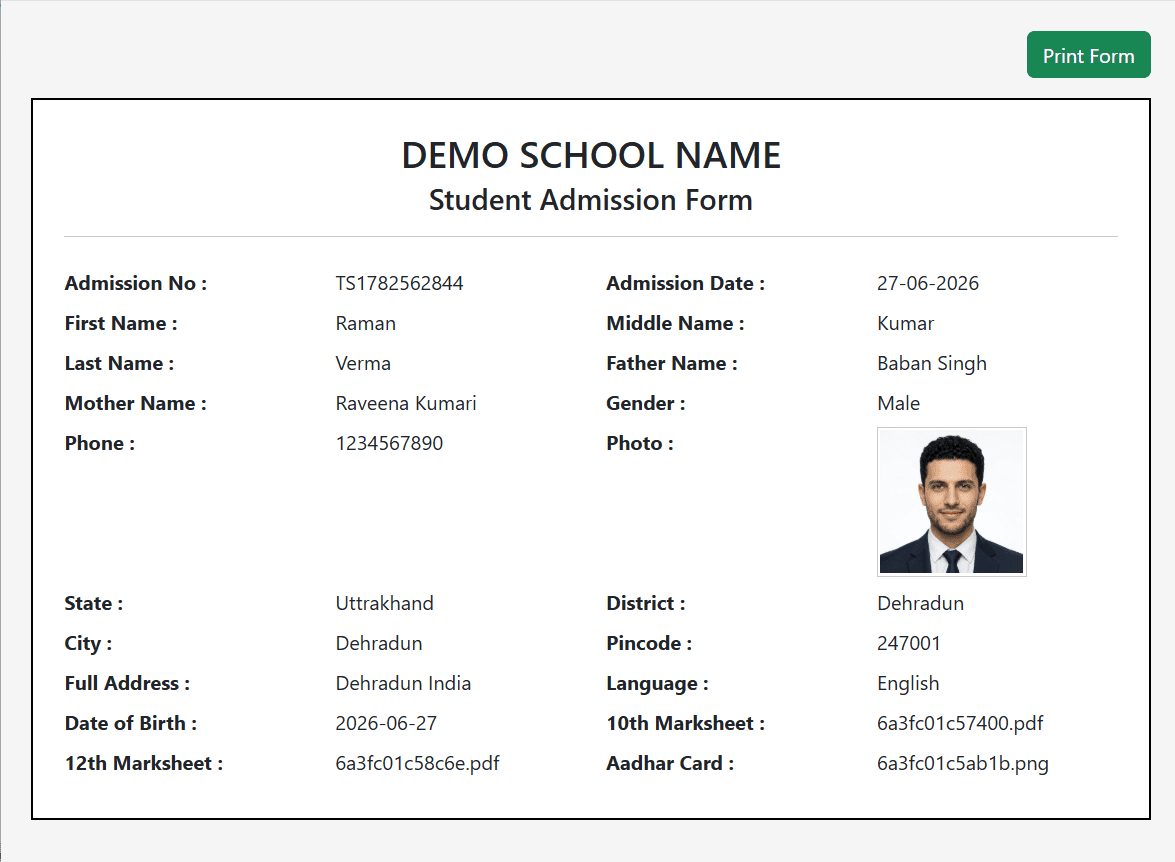
5. Print Student Admission Form
The Print Preview page is one of the most important parts of the admission process.
After a student submits the admission form, they will automatically be redirected to the Print Preview page, where they can view all the submitted information and print it for future reference.
Now let's create the Print Preview page.
print.php
<?php require 'config.php';

$id=$_GET['id'];

$student=$pdo->prepare("SELECT * FROM students WHERE id=?");
$student->execute([$id]);
$student=$student->fetch();
$fields=$pdo->prepare("
SELECT ff.field_label,ff.field_type,sfv.field_value
FROM student_field_values sfv
INNER JOIN form_fields ff ON ff.id=sfv.field_id
WHERE sfv.student_id=:id
");
$fields->execute([':id'=>$id]);
$fields=$fields->fetchAll(PDO::FETCH_ASSOC);
?>

<!DOCTYPE html>
<html>
<head>

<title>Student Admission Form</title>

<link href="https://cdn.jsdelivr.net/npm/bootstrap@5.3.3/dist/css/bootstrap.min.css" rel="stylesheet">

<style>

body{
    background:#f5f5f5;
}

.admission-form{
	background: #fff;
    width:100%;
    min-width:100%;
    box-sizing:border-box;
    border:2px solid #000;
    padding:25px;
}
.form-value{
    min-height:25px;
}
@media print{
    @page{
        size:A4;
        margin:10mm;
    }

    html,
    body{
        width:100%;
        margin:0;
        padding:0;
    }

    .container-fluid{
        width:100% !important;
        max-width:100% !important;
        padding:0 !important;
        margin:0 !important;
    }

    .row{
        margin:0 !important;
    }

    .col-12{
        padding:0 !important;
    }

    .admission-form{
        width:100% !important;
        min-width:100% !important;
        margin:0 !important;
        border:2px solid #000;
        page-break-inside:avoid;
    }

    .no-print{
        display:none !important;
    }

}

</style>

</head>

<body>

<div class="container-fluid p-4">

<div class="row">

<div class="col-12 text-end mb-3 no-print">

<button onclick="window.print()" class="btn btn-success">
Print Form
</button>

</div>

<div class="col-12">

<div class="admission-form">

<div class="text-center mb-4">

<h2 class="mb-1">
DEMO SCHOOL NAME
</h2>

<h4>
Student Admission Form
</h4>

<hr>

</div>

<div class="row mb-2">

<div class="col-sm-3">
<strong>Admission No :</strong>
</div>

<div class="col-sm-3">
<?= $student['admission_no']; ?>
</div>

<div class="col-sm-3">
<strong>Admission Date :</strong>
</div>

<div class="col-sm-3">
<?= date('d-m-Y'); ?>
</div>

</div>

<?php

$i=0;

foreach($fields as $field)
{

    if($i%2==0)
    {
        echo '<div class="row mb-2">';
    }

    echo '<div class="col-sm-3">';
    echo '<strong>'.htmlspecialchars($field['field_label']).' :</strong>';
    echo '</div>';

    echo '<div class="col-sm-3">';

    if($field['field_type']=='image' && !empty($field['field_value']))
    {
        echo '<img src="uploads/'.htmlspecialchars($field['field_value']).'" style="width:120px;height:120px;border:1px solid #ccc;padding:2px;">';
    }
    else
    {
        echo htmlspecialchars($field['field_value']);
    }

    echo '</div>';

    $i++;

    if($i%2==0)
    {
        echo '</div>';
    }

}

if($i%2!=0)
{
    echo '<div class="col-sm-3"></div>';
    echo '<div class="col-sm-3"></div>';
    echo '</div>';
}

?>

</body>
</html>
In the print page, we display all dynamic custom field values such as Student Name, First Name, Last Name, Email, Father's Name, Mother's Name, Student ID, Student Photo, and every other field created by the admin.
We have also added a Print Form button that allows students to print their admission form. The form can either be printed directly using a printer or saved as a PDF file.

6. Student Admission List
This page displays the complete list of admitted students.
From this page, the admin can:
- View Student Details
- Edit Student Information
- Delete Student Records
It is a simple CRUD (Create, Read, Update, Delete) feature for managing student admissions.
students.php
<?php require("config.php");
$stmt=$pdo->query("SELECT * FROM students ORDER BY id DESC");
$data=$stmt->fetchAll(PDO::FETCH_ASSOC);
?>
<!DOCTYPE html>
<html>
<head>
<link href="https://cdn.jsdelivr.net/npm/bootstrap@5.3.3/dist/css/bootstrap.min.css" rel="stylesheet">
</head>
<body>
<div class="container mt-5">
<h3>Students List</h3>
<table class="table table-bordered">
<tr>
<th>ID</th>
<th>Admission No</th>
<th>Details</th>
<th>Action</th>
</tr>
<?php foreach($data as $row){ ?>

<?php

$nameFields=$pdo->prepare("
SELECT ff.field_label,sfv.field_value
FROM student_field_values sfv
INNER JOIN form_fields ff ON ff.id=sfv.field_id
WHERE sfv.student_id=?
ORDER BY ff.id ASC
LIMIT 4
");

$nameFields->execute([$row['id']]);

$nameFields=$nameFields->fetchAll(PDO::FETCH_ASSOC);

$name='';

foreach($nameFields as $field)
{
    $name.='<b>'.$field['field_label'].'</b> : '.$field['field_value'].'<br>';
}

?>

<tr>

<td><?= $row['id']; ?></td>

<td><?= $row['admission_no']; ?></td>

<td><?= $name; ?></td>

<td>

<a href="print.php?id=<?= $row['id']; ?>"
class="btn btn-primary btn-sm">
Reprint
</a>

</td>

</tr>

<?php } ?>
</table>
</div>
</body>
</html>
By following this tutorial, you can easily create a complete Student Admission Form for any school or college website.
In this project, we used PHP, MySQL, and Bootstrap to build a fully dynamic student admission system with customizable form fields, responsive design, print preview, and student management functionality.
Recommended Posts:-