We will use the Razorpay test app (Razorpay pay and verify ) in this project.
Now, we will create products with the product title, price, and product image. Users can buy these products from your website using the Razorpay payment gateway. We will use bootstrap to make responsive forms, tables, product cards, etc.
Let’s create products –
create-product.php
<?php require_once("config.php");?>
<!DOCTYPE html>
<html>
<head>
	<meta charset="utf-8">
	<meta name="viewport" content="width=device-width, initial-scale=1">
	<title>Add Product - Techno Smarter </title>
<link href="https://cdn.jsdelivr.net/npm/bootstrap@5.2.2/dist/css/bootstrap.min.css" rel="stylesheet">
<link rel="stylesheet" type="text/css" href="style.css">
</head>
<body>
<div class="container">
	<div class="row">
		<div class="col-sm-3"></div>
		<div class="col-sm-6 form-container">
				<h1>Create a Product </h1>
				<?php
				if(isset($_POST['submit_form']))
				{
				$title=$_POST['title'];
				$price=$_POST['price'];
				$folder = "uploads/";
$image_file=$_FILES['image']['name'];
 $file = $_FILES['image']['tmp_name'];
 $path = $folder . $image_file;
 $target_file=$folder.basename($image_file);
 	//move image to the folder
move_uploaded_file($file,$target_file);
 $sql="INSERT into products(title,price,image) VALUES(:title,:price,:image)";
	    $stmt = $db->prepare($sql);
      $stmt->bindParam(':title', $title, PDO::PARAM_STR);
      $stmt->bindParam(':price', $price, PDO::PARAM_STR);
      $stmt->bindParam(':image', $image_file, PDO::PARAM_STR);
       $stmt->execute();
       header("location:products.php");
				}
				?>
			<form action="" method="POST" enctype="multipart/form-data">
  <div class="mb-3">
    <label  class="label">Product Title </label>
    <input type="text" class="form-control" name="title" required>
  </div>
  <div class="mb-3">
    <label class="label">Product Price</label>
    <input type="number" class="form-control" name="price" required>
  </div>
  <div class="mb-3">
    <label class="label">Product Image</label>
    <input type="file" class="form-control" name="image" accept="image/*" required>
  </div>

  <button type="submit" class="btn btn-primary" name="submit_form">Create</button>

	</form>
		</div>
		<div class="col-sm-3"></div>
	</div>

</div>
</body>
</html>
In the above code, we have created a simple insert query using PHP PDO-prepared statements.
Note – Kindly create an uploads folder in your project folder. Create a new folder name "uploads"

After that, we display all products on another page.
products.php
<?php require_once("config.php");?>
<!DOCTYPE html>
<html>
<head>
	<meta charset="utf-8">
	<meta name="viewport" content="width=device-width, initial-scale=1">
	<title>Products - Techno Smarter </title>
<link href="https://cdn.jsdelivr.net/npm/bootstrap@5.2.2/dist/css/bootstrap.min.css" rel="stylesheet">
<link rel="stylesheet" type="text/css" href="style.css">
</head>
<body>
<div class="container">
	<div class="row">
		<div class="col-sm-2"></div>
		<div class="col-sm-8 form-container">
				<h1>Products</h1>
				<hr>
				<a href="create-product.php" class="btn btn-primary" style="float:right;">Create New </a>
				<table class="table">
					<tr>
						<th>Image</th>
						<th>Title</th>
						<th>Price</th>
					</tr>
				<?php
					 $sql="SELECT * from products order by pid DESC";
         $stmt = $db->prepare($sql);
           $stmt->execute();
           $rows=$stmt->fetchAll();
           foreach ($rows as $row) {
           echo '<tr>
              <td><img src="uploads/'.$row['image'].'" height="100"></td>
               <td>'.$row['title'].'</td>
               <td>'.$row['price'].' INR</td>
           </tr>';
           }
				?>
		</table>
		</div>
		<div class="col-sm-2"></div>
	</div>
</div>
</body>
</html>
In the above code, we fetched and display all products.

If you want to design these forms, kindly use the below CSS stylesheet.
style.css
body{
background-color: #f1f1f1;
    }
.form-container
 {
   padding: 20px;
    border-radius: 20px;
    background-color: #fff;
    margin-top: 10px ;
}
.label{
    font-weight: 500;
}
.razorpay-payment-button{
background-color: #00BD68;
  border-radius: 5px;
  color: #FFFFFF;
  cursor: pointer;
  height: 44px;
  line-height: 44px;
  width: 100%;
  border: 0;
}
Products are created. Now, we will fetch and display these products on the index page with the buy now button.
index.php
<?php require_once("config.php");?>
<!DOCTYPE html>
<html>
<head>
	<meta charset="utf-8">
	<meta name="viewport" content="width=device-width, initial-scale=1">
	<title>Shop - Techno Smarter </title>
<link href="https://cdn.jsdelivr.net/npm/bootstrap@5.2.2/dist/css/bootstrap.min.css" rel="stylesheet">
<link rel="stylesheet" type="text/css" href="style.css">
</head>
<body>
<div class="container">
	<div class="row">
		<div class="col-sm-12 form-container">
				<h1>Shop </h1>
<hr>
				<div class="row">
					<?php
					 $sql="SELECT * from products order by pid DESC";
         $stmt = $db->prepare($sql);
           $stmt->execute();
           $rows=$stmt->fetchAll();
           foreach ($rows as $row) {
       echo '<div class="col-4 text-center"><div class="card" style="width: 18rem;">
  <img class="card-img-top" src="uploads/'.$row['image'].'" alt="Card image cap">
  <div class="card-body">
    <h5 class="card-title">'.$row['title'].'</h5>
    <p class="card-text">'.$row['price'].' INR</p>
    <a href="checkout.php?product_id='.$row['pid'].'" class="btn btn-primary">Buy Now</a>
  </div>
</div></div>';

}
				?>
				</div>
		</div>
	</div>
</div>
</body>
</html>
The user will click on the buy now button and process for checkout. This is a similar process to the eCommerce system in PHP with a Razorpay payment gateway.

Now, we will create a checkout page to receive user data. As you know, we create a checkout page in the eCommerce system to receive user data and process payment using the Razorpay payment gateway.
Let's create a checkout page
checkout.php
<?php require_once("config.php"); $pid=$_GET['product_id'];
 $sql="SELECT count(*) from products WHERE pid=:pid";
    	 $stmt = $db->prepare($sql);
           $stmt->bindParam(':pid', $pid, PDO::PARAM_INT);
           $stmt->execute();
          $count=$stmt->fetchcolumn();
      if($count==0)
      {
      	 header('location:index.php');
      	 exit();
      }
      ?>
<!DOCTYPE html>
<html>
<head>
	<meta charset="utf-8">
	<meta name="viewport" content="width=device-width, initial-scale=1">
	<title>Checkout - Techno Smarter </title>
<link href="https://cdn.jsdelivr.net/npm/bootstrap@5.2.2/dist/css/bootstrap.min.css" rel="stylesheet">
<link rel="stylesheet" type="text/css" href="style.css">
</head>
<body>
<div class="container">
	<div class="row">
		<div class="col-sm-12 form-container">
				<h1>Checkout</h1>
<hr>
<?php
if(isset($_POST['submit_form']))
{
$_SESSION['fname']=$_POST['fname'];
$_SESSION['lname']=$_POST['lname'];
$_SESSION['email']=$_POST['email'];
$_SESSION['mobile']=$_POST['mobile'];
$_SESSION['note']=$_POST['note'];
$_SESSION['address']=$_POST['address'];
$_SESSION['pid']=$pid;
if($_POST['email']!='')
{
header("location:pay.php");
}
}
?>
				<div class="row">
					<div class="col-8">
<form action="" method="POST">
  <div class="mb-3">
    <label  class="label">First Name</label>
    <input type="text" class="form-control" name="fname" required>
  </div>
  <div class="mb-3">
    <label class="label">Last Name</label>
    <input type="text" class="form-control" name="lname" required>
  </div>

  <div class="mb-3">
    <label class="label">Email </label>
    <input type="email" class="form-control" name="email" required>
  </div>
  <div class="mb-3">
    <label class="label">Mobile</label>
    <input type="number" class="form-control" name="mobile" required>
  </div>
  <div class="mb-3">
    <label class="label">Address</label>
   <textarea name="address" class="form-control" name="address" required></textarea>
  </div>
  <div class="mb-3">
    <label class="label">Note</label>
   <textarea name="note" class="form-control" name="note"></textarea>
  </div>
					</div>
					<div class="col-4 text-center">
					<?php
					 $sql="SELECT * from products WHERE pid=:pid";
         $stmt = $db->prepare($sql);
           $stmt->bindParam(':pid',$pid,PDO::PARAM_INT);
            $stmt->execute();
           $row=$stmt->fetch();
       echo '<div class="card" style="width: 18rem;">
  <img class="card-img-top" src="uploads/'.$row['image'].'" alt="Card image cap">
  <div class="card-body">
    <h5 class="card-title">'.$row['title'].'</h5>
    <p class="card-text">'.$row['price'].' INR</p>
  </div>
</div>';
				?>
				<br>
				  <button type="submit" class="btn btn-primary" name="submit_form">Place Order</button>
	</form>
				</div>
				</div>
		</div>
	</div>
</div>
</body>
</html>
We have created an HTML form with the product image in the above code. We are getting the product id from the URL. As you can see, there is a place order button.
Logic – We will take all details from the buyer and save them in different session variables and we will use these details during payment time using Razorpay UPI.

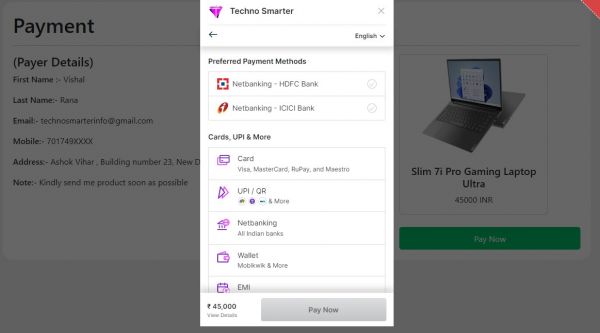
When you will click the place order button, you will be redirected to the payment page. We will use Razorpay PHP SDK and Test app code in this file and will send all user details to Razorpay with the Razorpay API URL.
pay.php
<?php require('razorpay-php/Razorpay.php'); require_once("config.php");
      if(!isset($_SESSION['email']))
      {
      	 header('location:index.php');
      	 exit();
      }
      else
      {
        $pid=$_SESSION['pid'];
      }
      ?>
<!DOCTYPE html>
<html>
<head>
	<meta charset="utf-8">
	<meta name="viewport" content="width=device-width, initial-scale=1">
	<title>Payment - Techno Smarter </title>
<link href="https://cdn.jsdelivr.net/npm/bootstrap@5.2.2/dist/css/bootstrap.min.css" rel="stylesheet">
<link rel="stylesheet" type="text/css" href="style.css">
</head>
<body>
<div class="container">
	<div class="row">
		<div class="col-sm-12 form-container">
				<h1>Payment</h1>
<hr>
<?php
include("gateway-config.php");
//Razorpay//
use Razorpay\Api\Api;

$api = new Api($keyId, $keySecret);
$firstname=$_SESSION['fname'];
$lastname=$_SESSION['lname'];
 $email=$_SESSION['email'];
$mobile=$_SESSION['mobile'];
$address=$_SESSION['address'];
$note=$_SESSION['note'];
$sql="SELECT * from products WHERE pid=:pid";
         $stmt = $db->prepare($sql);
           $stmt->bindParam(':pid',$pid,PDO::PARAM_INT);
            $stmt->execute();
           $row=$stmt->fetch();
           $price=$row['price'];
           $_SESSION['price']=$price;
           $title=$row['title'];
$webtitle='Techno Smarter'; // Change web title
$displayCurrency='INR';
$imageurl='https://technosmarter.com/assets/images/Avatar.png'; //change logo from here
$orderData = [
    'receipt'         => 3456,
    'amount'          => $price * 100, // 2000 rupees in paise
    'currency'        => 'INR',
    'payment_capture' => 1 // auto capture
];
$razorpayOrder = $api->order->create($orderData);

$razorpayOrderId = $razorpayOrder['id'];

$_SESSION['razorpay_order_id'] = $razorpayOrderId;

$displayAmount = $amount = $orderData['amount'];

if ($displayCurrency !== 'INR')
{
    $url = "https://api.fixer.io/latest?symbols=$displayCurrency&base=INR";
    $exchange = json_decode(file_get_contents($url), true);

    $displayAmount = $exchange['rates'][$displayCurrency] * $amount / 100;
}

$data = [
    "key"               => $keyId,
    "amount"            => $amount,
    "name"              => $webtitle,
    "description"       => $title,
    "image"             => $imageurl,
    "prefill"           => [
    "name"              => $firstname.' '.$lastname,
    "email"             => $email,
    "contact"           => $mobile,
    ],
    "notes"             => [
    "address"           => $address,
    "merchant_order_id" => "12312321",
    ],
    "theme"             => [
    "color"             => "#F37254"
    ],
    "order_id"          => $razorpayOrderId,
];

if ($displayCurrency !== 'INR')
{
    $data['display_currency']  = $displayCurrency;
    $data['display_amount']    = $displayAmount;
}

$json = json_encode($data);


 ?>
				<div class="row">
					<div class="col-8">
            <h4>(Payer Details)</h4>
  <div class="mb-3">
    <label  class="label">First Name :- </label>
     <?php echo $firstname; ?>
  </div>
  <div class="mb-3">
    <label class="label">Last Name:- </label>
      <?php echo $lastname; ?>
  </div>

  <div class="mb-3">
    <label class="label">Email:- </label>
      <?php echo $email; ?>
  </div>
  <div class="mb-3">
    <label class="label">Mobile:- </label>
      <?php echo $mobile; ?>
  </div>
  <div class="mb-3">
    <label class="label">Address:- </label>
    <?php echo $address; ?>
  </div>
  <div class="mb-3">
    <label class="label">Note:- </label>
    <?php echo $note; ?>
  </div>


					</div>
					<div class="col-4 text-center">
					<?php
					 $sql="SELECT * from products WHERE pid=:pid";
         $stmt = $db->prepare($sql);
           $stmt->bindParam(':pid',$pid,PDO::PARAM_INT);
            $stmt->execute();
           $row=$stmt->fetch();
       echo '<div class="card" style="width: 18rem;">
  <img class="card-img-top" src="uploads/'.$row['image'].'" alt="Card image cap">
  <div class="card-body">
    <h5 class="card-title">'.$row['title'].'</h5>
    <p class="card-text">'.$row['price'].' INR</p>
  </div>
</div>';
				?>
				<br>
				  <center>
   <form action="verify.php" method="POST">
  <script
    src="https://checkout.razorpay.com/v1/checkout.js"
    data-key="<?php echo $data['key']?>"
    data-amount="<?php echo $data['amount']?>"
    data-currency="INR"
    data-name="<?php echo $data['name']?>"
    data-image="<?php echo $data['image']?>"
    data-description="<?php echo $data['description']?>"
    data-prefill.name="<?php echo $data['prefill']['name']?>"
    data-prefill.email="<?php echo $data['prefill']['email']?>"
    data-prefill.contact="<?php echo $data['prefill']['contact']?>"
    data-notes.shopping_order_id="<?php echo $pid;?>"
    data-order_id="<?php echo $data['order_id']?>"
    <?php if ($displayCurrency !== 'INR') { ?> data-display_amount="<?php echo $data['display_amount']?>" <?php } ?>
    <?php if ($displayCurrency !== 'INR') { ?> data-display_currency="<?php echo $data['display_currency']?>" <?php } ?>
  >
  </script>
  <!-- Any extra fields to be submitted with the form but not sent to Razorpay -->
  <input type="hidden" name="shopping_order_id" value="<?php echo $pid;?>">
</form>
</center>

				</div>
				</div>
		</div>
	</div>
</div>
</body>
</html>
In the above code, first of all, we included the Razorpay.php file from the razorpay-php folder that we already moved in our project from Razorpay SDK .
We get user data from the session variable. We use these variables in the Razorpay array . Order is an important step in the payment process. Order and Payments go hand-in-hand. For every payment, an order needs to be created. It is mandatory to create orders to automatically capture the payments. The pay.php file will contain the checkout parameters.
The gateway-config.php file will contain the API keys and will be called in the pay.php file.
Now, create a gateway config file.
gateway-config.php
<?php
//set your razorpay account keyid and keysecret ,
//get from razorpay account in settings
$keyId='rzp_test_mptstsJsjssu65w9';
$keySecret='7tststsmnERsoksgDfKFEuY90';
?>
Kindly set your live or test keyId and keySecret from your Razorpay pay account. Check-in settings.
If you want to use the Razorpay test mode credential (keyid,keySecret) then change the mode to test from the top menu. This is better to use test credentials before live mode. You can find Razorpay test card details like this.
In the next step, we will verify the payment request from the Razorpay API. So, let’s create verify page that will display payment status like – paid or not, successful or failed, payer email, payer email, etc. We get the payment transaction id from Razorpay API and store it in our database table along with the payer name, email, date, and product id from the session variables because we already created these session variables on the checkout page to store data in the database table.
verify.php
<?php require('razorpay-php/Razorpay.php'); require_once("config.php");
        $pid=$_SESSION['pid'];
      ?>
<!DOCTYPE html>
<html>
<head>
	<meta charset="utf-8">
	<meta name="viewport" content="width=device-width, initial-scale=1">
	<title>Payment Verification - Techno Smarter </title>
<link href="https://cdn.jsdelivr.net/npm/bootstrap@5.2.2/dist/css/bootstrap.min.css" rel="stylesheet">
<link rel="stylesheet" type="text/css" href="style.css">
</head>
<body>
<div class="container">
	<div class="row">
		<div class="col-sm-12 form-container">
				<h1>Payment Status</h1>
<hr>


				<div class="row">
					<div class="col-8">
            <?php
use Razorpay\Api\Api;
use Razorpay\Api\Errors\SignatureVerificationError;
$success = true;
include("gateway-config.php");
$error = "Payment Failed";
if (empty($_POST['razorpay_payment_id']) === false)
{
    $api = new Api($keyId, $keySecret);

    try
    {
        // Please note that the razorpay order ID must
        // come from a trusted source (session here, but
        // could be database or something else)
        $attributes = array(
            'razorpay_order_id' => $_SESSION['razorpay_order_id'],
            'razorpay_payment_id' => $_POST['razorpay_payment_id'],
            'razorpay_signature' => $_POST['razorpay_signature']
        );

        $api->utility->verifyPaymentSignature($attributes);
    }
    catch(SignatureVerificationError $e)
    {
        $success = false;
        $error = 'Razorpay Error : ' . $e->getMessage();
    }
}
if ($success === true)
{
 $firstname=$_SESSION['fname'];
$lastname=$_SESSION['lname'];
 $email=$_SESSION['email'];
$mobile=$_SESSION['mobile'];
$address=$_SESSION['address'];
$note=$_SESSION['note'];
$productinfo='Payment';

$posted_hash = $_SESSION['razorpay_order_id'];
    if(isset($_POST['razorpay_payment_id']))

    $txnid = $_POST['razorpay_payment_id'];
    $amount = $_SESSION['price'];
    $status='success';
  $eid=$_POST['shopping_order_id'];
$subject='Your payment has been successful..';
       $key_value='okpmt';

$currency='INR';
$date = new DateTime(null, new DateTimezone("Asia/Kolkata"));
$payment_date=$date->format('Y-m-d H:i:s');
     $sql="SELECT count(*) from payments WHERE txnid=:txnid";
       $stmt = $db->prepare($sql);
           $stmt->bindParam(':txnid', $txnid, PDO::PARAM_STR);
           $stmt->execute();
          $countts=$stmt->fetchcolumn();
  if($txnid!=''){
    if($countts<=0)
    {
      $sql="INSERT INTO payments(firstname,lastname,amount,status,txnid,pid,payer_email,currency,mobile,address,note,payment_date) VALUES(:firstname,:lastname,:amount,:status,:txnid,:pid,:payer_email,:currency,:mobile,:address,:note,:payment_date)";
       $stmt = $db->prepare($sql);
           $stmt->bindParam(':firstname', $firstname, PDO::PARAM_STR);
           $stmt->bindParam(':lastname', $lastname, PDO::PARAM_STR);
           $stmt->bindParam(':amount', $amount, PDO::PARAM_STR);
           $stmt->bindParam(':status', $status, PDO::PARAM_STR);
           $stmt->bindParam(':txnid', $txnid, PDO::PARAM_STR);
           $stmt->bindParam(':pid', $pid, PDO::PARAM_INT);
           $stmt->bindParam(':payer_email', $email, PDO::PARAM_STR);
           $stmt->bindParam(':currency', $currency, PDO::PARAM_STR);
           $stmt->bindParam(':mobile', $mobile, PDO::PARAM_STR);
          $stmt->bindParam(':address', $address, PDO::PARAM_STR);
           $stmt->bindParam(':note', $note, PDO::PARAM_STR);
            $stmt->bindParam(':payment_date', $payment_date, PDO::PARAM_STR);
           $stmt->execute();
}
 // start
        echo ' <h2 style="color:#33FF00";>'.$subject.'</h2>   <hr>';

        echo '<table class="table">';
        echo '<tr> ';
$rows= $sql="SELECT * from payments WHERE txnid=:txnid";
         $stmt = $db->prepare($sql);
           $stmt->bindParam(':txnid',$txnid,PDO::PARAM_STR);
            $stmt->execute();
           $rows=$stmt->fetchAll();
foreach($rows as $row)
{
    $dbdate = $row['payment_date'];
}
echo '<tr>
          <th>Transaction ID:</th>
        <td>'.$txnid.'</td>
    </tr>
     <tr>
        <th>Paid Amount:</th>
        <td>'.$amount.' '. $currency.'</td>
    </tr>
    <tr>
       <th>Payment Status:</th>
        <td>'.$status.'</td>
   </tr>
   <tr>
       <th>Payer Email:</th>
       <td>'.$email.'</td>
   </tr>
    <tr>
       <th>Name:</th>
       <td>'.$firstname.' '.$lastname.'</td>
   </tr>
   <tr>
       <th>Address:</th>
       <td>'.$address.'</td>
   </tr>
   <tr>
       <th>Note:</th>
       <td>'.$note.'</td>
   </tr>

   <tr>
       <th>Date :</th>
       <td>'.$dbdate.'</td>
  </tr>
  </table>';
}
 else
 {
  $html = "<p><div class='errmsg'>Invalid Transaction. Please Try Again</div></p>";
  $error_found=1;
 }
}
else
{
    $html = "<p><div class='errmsg'>Invalid Transaction. Please Try Again</div></p>
             <p>{$error}</p>";
             $error_found=1;
}
if(isset($html)){
echo $html;
}
?>
					</div>
					<div class="col-4 text-center">
					<?php
          if(!isset($error_found)){
					 $sql="SELECT * from products WHERE pid=:pid";
         $stmt = $db->prepare($sql);
           $stmt->bindParam(':pid',$pid,PDO::PARAM_INT);
            $stmt->execute();
           $row=$stmt->fetch();
       echo '<div class="card" style="width: 18rem;">
  <img class="card-img-top" src="uploads/'.$row['image'].'" alt="Card image cap">
  <div class="card-body">
    <h5 class="card-title">'.$row['title'].'</h5>
  </div>
</div>';
}
				?>
				<br>
				</div>
				</div>
		</div>
	</div>
</div>
</body>
</html>
In the code above, first of all, we included the same Razorpay.php PHP file from the razorpay-php folder that we already moved to in our project. As you can see, we are using Razorpay API. So, we get razorpay_payment_id (transaction id) from the UPI data using Razorpay UPI.
Here, we have created an insert query to insert data into the database. We displayed payment details with a success message or if payment failed or the transaction id is empty then display the message “Invalid Transaction. Please Try Again”.

We have already discussed that we are created a simple eCommerce system in PHP with Razorpay. We are integrating the Razorpay payment gateway using PHP and MYSQL database.
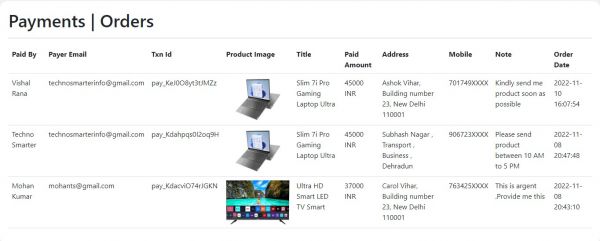
Now, we will display all payments (orders ) on a page.
payments.php
<?php require_once("config.php");?>
<!DOCTYPE html>
<html>
<head>
	<meta charset="utf-8">
	<meta name="viewport" content="width=device-width, initial-scale=1">
	<title>Payments | Orders - Techno Smarter </title>
<link href="https://cdn.jsdelivr.net/npm/bootstrap@5.2.2/dist/css/bootstrap.min.css" rel="stylesheet">
<link rel="stylesheet" type="text/css" href="style.css">
</head>
<body>
<div class="container-fluid">
	<div class="row">
		<div class="col-sm-12 form-container">
				<h1>Payments | Orders</h1>
				<hr>
				<table class="table">
					<tr>
						 <th>Paid By </th>
						 <th>Payer Email</th>
						  <th>Txn Id </th>
						<th>Product Image</th>
						<th>Title</th>
						<th>Paid Amount</th>
							<th>Address</th>
							<th>Mobile</th>
								<th>Note</th>
							 <th>Order Date</th>
					</tr>
				<?php
					 $sql="SELECT * from products,payments WHERE products.pid=payments.pid order by payments.payid DESC ";
         $stmt = $db->prepare($sql);
           $stmt->execute();
           $rows=$stmt->fetchAll();
           foreach ($rows as $row) {
           echo '<tr>
           <td>'.$row['firstname'].' '.$row['lastname'].'</td>
           <td>'.$row['payer_email'].'</td>
            <td>'.$row['txnid'].'</td>
              <td><img src="uploads/'.$row['image'].'" height="100"></td>
               <td>'.$row['title'].'</td>
               <td>'.$row['amount'].' INR</td>
               <td>'.$row['address'].'</td>
               <td>'.$row['mobile'].'</td>
               <td>'.$row['note'].'</td>
               <td>'.$row['payment_date'].'</td>
           </tr>';
           }
				?>
		</table>
		</div>
	</div>

</div>
</body>
</html>
You can use it as an orders page or a payments page. Admin can check all payments or orders on this page.
Now, you can execute your web app and test it on Razorpay test mode or after that change test credentials to live mode credentials.