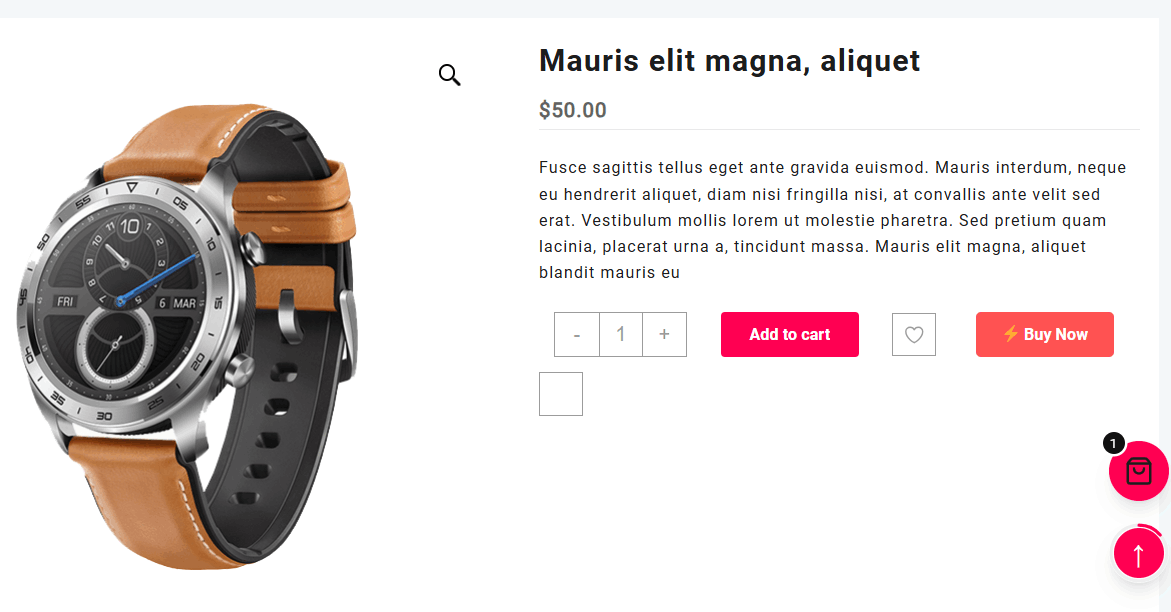
For any eCommerce website, the WordPress theme must have all the required features. In this tutorial, we will learn how to add a Buy Now button to a WooCommerce theme.
Adding a Buy Now button to a WordPress WooCommerce theme is very important because when a customer visits a product page, they can click the Buy Now button and go directly to the checkout page. This is how websites like Amazon, Flipkart, Meesho, and Snapdeal work. The customer visits the product page, clicks the Buy Now button, and purchases the product directly.
If your WordPress theme only has an Add to Cart button and does not have a Buy Now button, the customer must first add the product to the cart, then go to the cart page, and finally proceed to the checkout page. This becomes a long process.
To solve this problem, we will learn how to add a Buy Now button to a WooCommerce theme. We will show you two methods. The first method is by adding code manually, and the second method is by using a free WordPress plugin. If you do not want to do any coding, you can simply install the plugin and add the Buy Now button. We have also provided the plugin and all the required steps.
First, we will learn how to add the Buy Now button using code. After adding this button, customers can click it and go directly to the checkout page. Many WordPress themes do not include this feature. If you have already purchased such a theme, it can affect your sales because customers have to follow the long process of adding the product to the cart before checking out.
If your product page has a Buy Now button that takes customers directly to the checkout page, it makes shopping much easier for users and can also help increase your sales.
Method 1 - Add a Buy Now button to a WooCommerce product page without a plugin.
Now, let's learn how to add the Buy Now button to a WooCommerce theme.
1. Go to the Theme File Editor in the WordPress admin panel -
First, go to your WordPress admin panel. On the left sidebar, you will find the Appearance option. Move your mouse over it and click on Theme File Editor.
Appearance->Theme File Editor
2. Open the functions.php file
Here, you will see all the files of your current theme. Open the functions.php file and add the code given below at the end of the file. After that, save the file.
add_action( 'woocommerce_after_add_to_cart_button', 'ts_custom_add_buy_now_button' );
function ts_custom_add_buy_now_button() {
    global $product;
    if ( ! $product ) return;
    ?>
    <button type="button" class="button alt ts-buy-now-btn" data-product-id="<?php echo esc_attr( $product->get_id() ); ?>" style="background-color: #ff5252 !important; color: #ffffff !important; margin-left: 10px; font-weight: bold; border-radius: 4px; display: inline-block;">
        ⚡ Buy Now
    </button>
    <?php
}

add_filter( 'woocommerce_add_to_cart_redirect', 'ts_custom_redirect_to_checkout', 9999 );
function ts_custom_redirect_to_checkout( $url ) {
    if ( isset( $_REQUEST['ts_quick_buy'] ) && $_REQUEST['ts_quick_buy'] == '1' ) {
        return wc_get_checkout_url();
    }
    return $url;
}

add_action( 'wp_footer', 'ts_custom_buy_now_ajax_bypass_script' );
function ts_custom_buy_now_ajax_bypass_script() {
    if ( ! is_product() ) return;
    ?>
    <script type="text/javascript">
    jQuery(document).ready(function($) {
        $(document).on('click', '.ts-buy-now-btn', function(e) {
            e.preventDefault();

            var form = $(this).closest('form.cart');
            var productId = $(this).data('product-id');

            // Variable product ke liye check (Size/Color check)
            if (form.find('input[name="variation_id"]').length > 0) {
                var varId = form.find('input[name="variation_id"]').val();
                if (!varId || varId == 0) {
                    alert('Please select product options (size/color) before clicking Buy Now!');
                    return false;
                }
            }

            if (form.find('input[name="add-to-cart"]').length === 0) {
                form.append('<input type="hidden" name="add-to-cart" value="' + productId + '" />');
            } else {
                form.find('input[name="add-to-cart"]').val(productId);
            }

            if (form.find('input[name="ts_quick_buy"]').length === 0) {
                form.append('<input type="hidden" name="ts_quick_buy" value="1" />');
            } else {
                form.find('input[name="ts_quick_buy"]').val('1');
            }

            $(this).html('Please Wait...⏳').css({'opacity': '0.7', 'pointer-events': 'none'});


            form[0].submit();
        });
    });
    </script>
    <?php
}
Now, open any product page on your website, and you will see the Buy Now button.
If you face any problems, you can use the comment section below. Mention your theme name and where you purchased it, and we will help you solve the issue.
Method 2 - Add a Buy Now button to a WooCommerce product page with a plugin.
In the second method, we will learn how to add the Buy Now button using a plugin. This plugin is completely free, and you do not have to pay anything. It is specially made to add a Buy Now button to WooCommerce websites.
To use this free plugin, first click on the Download button.
Download Free Plugin
Once the download is complete, go to your WordPress admin panel and open the Plugins section.
Click on Add New Plugin, then click Upload Plugin, select the downloaded ZIP file, and install the plugin. After installing it, activate the plugin.
That's it. You can now easily add a Buy Now button to your WooCommerce website without writing any code.
In this tutorial, we learned both methods to add a free Buy Now button to a WooCommerce theme using coding and a plugin.
If you have any questions or face any problems, you can leave a comment below. We will be happy to help you add the Buy Now button to your website.
Recommended Posts:-
