If you have to display the prices of your products on your website, then you can use the Divi Pricing Table Module. You may have seen that many of the price cards are found on the website, by looking at which you buy by pricing table, if you want to buy the Divi theme, then you will go to the website where you will get a price table with the Different prices will see. From those prices, you can buy any price by selecting,
In the price table, the product name, details, price, currency or have a button. Whenever a visitor visits the website, the detail first looks at the product name, details and price and then buy the product by clicking on the Buy Now button.
Pricing Table module is a great tool for every business,
How To Use Pricing Table Module -
Insert a pricing table on a web page, it is very easy for you to insert a price table on the page. Open WordPress page edit with Divi.
After opening page, you have to insert the Pricing table from the Divi Modules.
To insert module, first, you have to select a row or column, after which you have to click on the insert module. After clicking on the inset module, you will have a window open from which you have to select the pricing table module. After selecting the pricing module, you have to make some settings,

Pricing table module settings-
First, you have to set the content.
1. Text:- Define text.
Title: - Define your title.
2. Subtitle: - The title display at the bottom of the title is called Submitted. Subtitles have a lower display.
3. Currency:- Hee you can define the currency sign(symbol of your country.

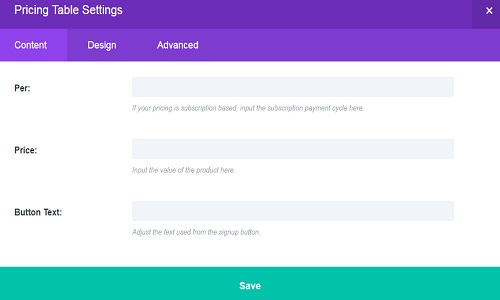
4. Per:
If your pricing is subscription based, input the subscription payment cycle here.
5. Price: -How much price for a product.
6. Button Text:- Define the button text like - Buy Now, View More etc that you need.

7. Content:- The table content. Define the pricing table content.
8. Link
Button URL:- Link the button. Input a link into the input box. Whenever a visitor clicks on the button then redirect to the linked page.
9 Background- Define the pricing table background color, background image or background video.
In this way, you will be able to set the content which will be displayed above the pricing table.
Now if you have to design a table then you will have to click on the design.
Design -
1. Layout - Make Table of Feature Table
2. Text
Text Orientation: -Here define the Text Alignment (Left, Center Right )
3. Text Shadow:- Apply the shadow effect on the text.
Text Shadow Color:- Which color of shadow effect you need.
4. Title Text
Title Heading Level:- Define the heading (H1 H2 H3 H4 H5 H6) size.
Title Font:- Define the title font
Title Font Style:- Here you can choose the style of the title.
Title Text Alignment:- Here define the Title Alignment (Left, Center Right )
Title Text Color: Which color you like for Title text.
Title Text Size:- Set the size for the title text.
5.Title Letter Spacing:- Here define the letter space of the title.
6.Title Text Shadow: Apply shadow effect on Title.
7. Body Text:-
Body Font:- Here define the font family for body text.
Body Font Style:- Style the body text. Use some style for body text.
Body Text Alignment:- Here define the Body Text Alignment (Left, Center Right )
Body Text Color:- Define body text color. Which color you like too.
Body Text Size:- Here you can define the size for body text color. Size in pixels.
Body Letter Spacing:- Define the letter spacing of Body text.
Body Text Shadow:- Here you can apply the text shadow.
8. Subheader Text
Subheader Font:- Here define the font family for Subheader text.
Subheader Font Style:- Style the body text. Use some style for Subheader text.
SubheaderText Alignment:- Here define the Subheader Text Alignment (Left, Center Right )
Subheader Text Color:- Define Subheader text color. Which color you like too .
Subheader Text Size:- Here you can define the size for Subheader text color. Size in pixels.
Subheader Letter Spacing:- Define the letter spacing of Subheader text.
Subheader Text Shadow:- Here you can apply the Subheader shadow.
9. Currency & Frequency Text
Currency & Frequency Font:- Here define the font family for Subheader text.
Currency & Frequency Font Style:- Style the Currency & Frequency text . Use some style for Subheader text .
Currency & Frequency Text Color:- Define Currency & Frequency text color . Which color you like too.
Currency & Frequency Text Size:- Here you can define the size for Currency & Frequency text color. Size in pixels.
Currency & Frequency Letter Spacing:- Define the letter spacing of Currency & Frequency text.
Subheader Text Shadow:- Here you can apply the Currency & Frequency shadow.
In this way, you can design a pricing table module.
If you want to use Extra CSS in the Pricing Table module, you can do it in Advance Option.
Advance-
1. Create a CSS
2. Define an ID
3. Define A class
Pricing Table Module Demo-
After setting the content and design, you have to click on the Publish button. Now let visit the page on which you have published the Pricing table Module.

Recommended Posts:-